

You open Unity Hub and start your first project. The editor loads, and suddenly you’re staring at six panels you don’t recognize. A blank gray grid. A file explorer. A mysterious “Inspector.” No characters. No levels. No obvious “Play” button. You click something in the Hierarchy. The camera jumps. Another click. Now the Scene view’s gone. Wait a minute… wasn’t this supposed to be easy?
Brackeys made Unity game development feel like a walk in the park. Instead, you’re eyebrows deep in MonoBehaviour, wrestling with scripts that won’t compile and wondering why “Play Mode” tosses errors like Koopa shells in Mario Kart.
The problem is, you expected a game engine that would help you make games. Well, don’t delete your Git account just yet. Unity is still one of the best tools out there. This article is your guide to master the Unity game engine. You’ll do it one step at a time, without earning a dev burnout badge along the way.
What Is Unity Game Development?
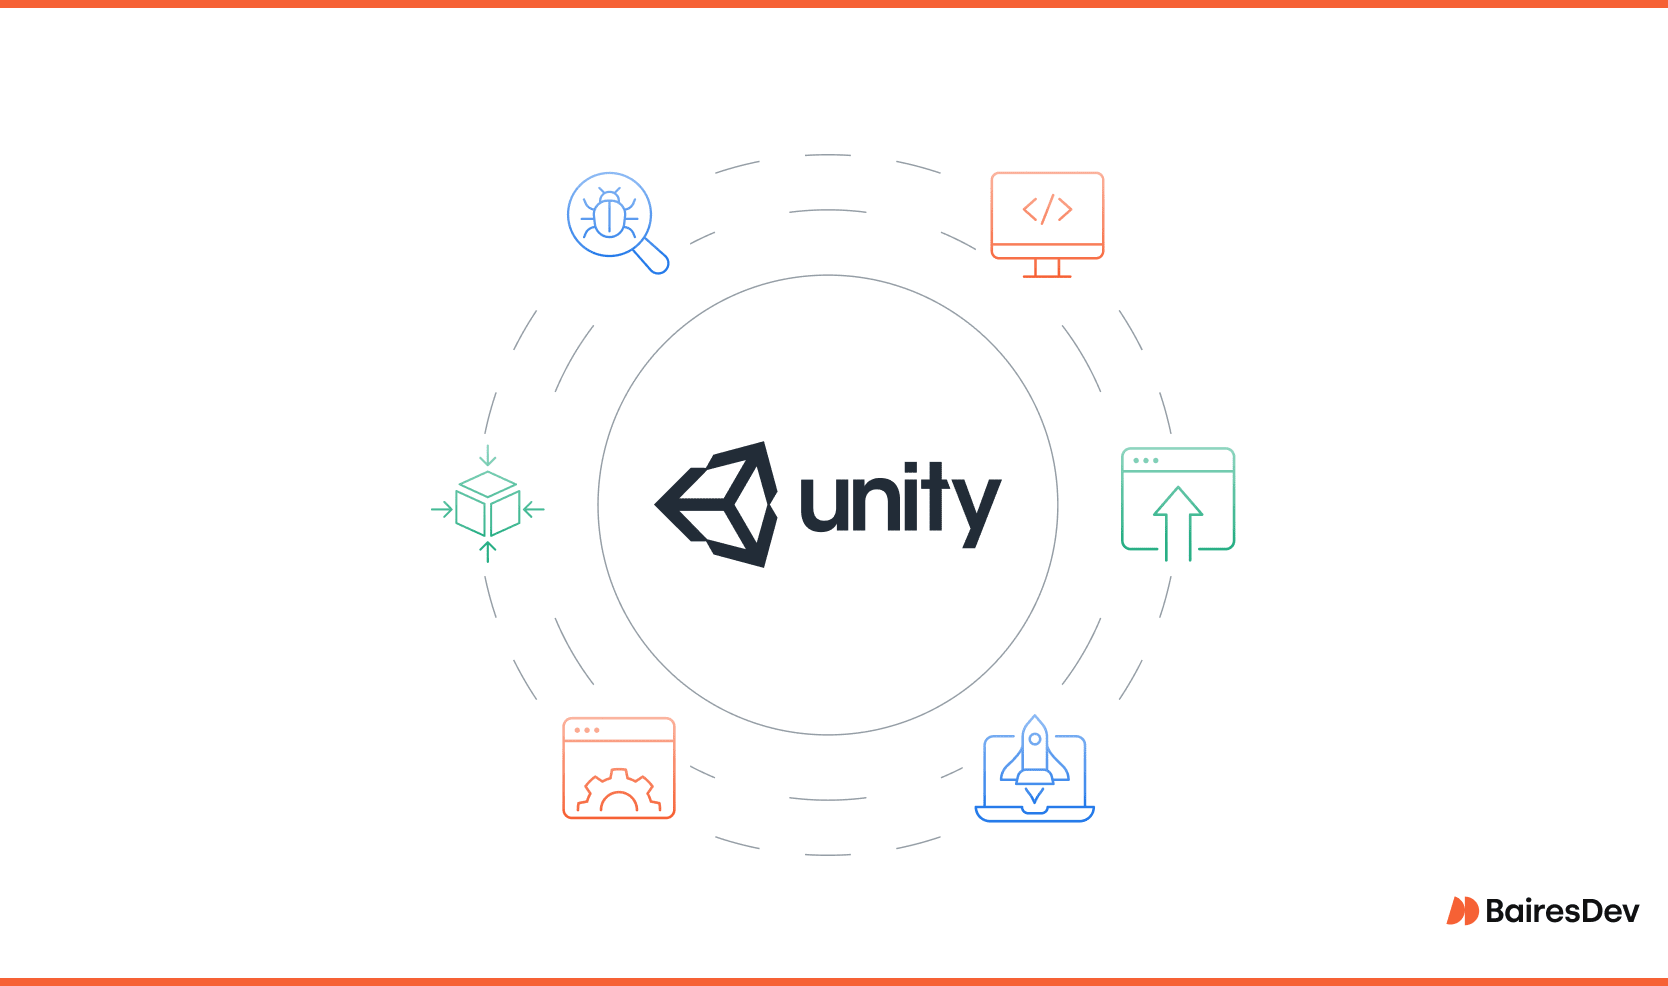
Unity game development is the art of making interactive experiences with the Unity game engine: a cross-platform 2D, 3D, VR, and mobile game tool. It’s trusted by indie studios and AAA developers thanks to deep resources and a dynamic community. Unity powers over 70% of all mobile games.
The Unity editor is where the magic happens. Here, you’ll move between Edit Mode and Play Mode, working with components, scripts, and scenes to assemble your game. The workflow centers on the C# programming language, used to control game logic, animations, physics, and UI elements.
To master the game engine, you need to think like a developer. You’ll debug code, tweak settings, and manage assets without drag-and-drop frustration.
How it Starts
Before you launch a project, you’ll start with Unity Hub. That’s a centralized dashboard that manages installs, templates, and your project lineup. Unity’s built-in Universal Render Pipeline (URP) helps optimize graphics across platforms without AAA hardware. Top games like Beat Saber and Fall Guys started right here, inside Unity’s toolkit.
If you’re overwhelmed, don’t fret. Start with a structured course like the ones on GameDev.tv, created by instructors like Rick Davidson. His hands-on tutorials simplify complex concepts and help future game developers understand the Unity engine.
Is Unity Still Worth Learning in 2025?
Even with its licensing drama, the Unity game engine is still the go-to for the bulk of indie and mid-tier developers. From stylized titles like Monument Valley to narrative-driven games like Tron: Catalyst, it’s powering most of the gaming fun right now.
But the waters aren’t calm. Unity’s 2023 monetization shake-up rattled its trust with devs. Worries about runtime fees and licensing unpredictability still fill the dev forums. Some game makers are turning to alternatives like Godot and Unreal.
That said, Unity still wins on speed-to-prototype. Tools like Unity Muse and the Unity Asset Store help developers spin up polished builds faster. Pros love the Universal Render Pipeline (URP) for creating consistent visuals. It’s one of the main reasons studios like Thunderful and Coatsink keep shipping Unity-powered games to platforms like Steam and Itch.
Let’s compare the landscape:
If your goal is to ship games, Unity still delivers. From John Lemon’s Haunted Jaunt to commercial titles by Bossa Studios, Unity offers a path to execute and iterate fast.
Is Unity perfect? Not quite. You’ll run into the occasional FPS drop or shader spaghetti. You’ll also contend with their licensing thresholds. Let’s take a look at how to manage those and other issues, and how to start out right.
First-Week Toolkit for Unity Beginners
Day one in the Unity editor can feel overwhelming, but with the right setup, you’ll get going in less time than it takes Double Stallion to ship another banger.
Here’s your first-week checklist. These tools help game developers avoid common pitfalls like click-and-pray settings and null reference, and lay the foundation for real progress.
- Unity Hub: Install and manage the latest LTS release for fewer bugs. It’ll also keep you in step with online tutorials and tools.
- Visual Studio (Community Edition): Use default IDE for Unity scripting. It’s built to support C# workflows. It also integrates directly with Unity’s own editor. Perfect for catching errors before they trigger runtime regrets.
- GameDev.tv Account: Get started with Rick Davidson’s beginner-friendly Unity courses. His clear, no-BS style is trusted by thousands of new game devs.
- Unity Asset Store: Download starter assets, sounds, and tools. Don’t waste time creating everything from scratch. This is where teams like Thunderful and Skies Bossa Studios fill gaps quickly.
- Unity Learn Profile: Track progress through official tutorials. Combine this with GameDev.tv to reinforce concepts and tap into Unity’s deep resources, dynamic community, and cross-platform support.
- GitHub Account: Version control saves lives, especially when you’re testing builds for indie projects like Dystopika or Dave the Diver. You’ll be glad to have backups and commit history.
Unity Hub Setup
Oh-oh. You skipped LTS and installed the latest beta. Now your project won’t open after an update. Let’s protect you from the build pipeline blues.
Install Unity Hub First
Unity Hub is your launchpad. It manages installations, templates, and project versions. Download it directly from Unity’s official site. Don’t install their editor standalone. You’ll risk fragmentation, especially if you’re juggling multiple projects.
Choose the Right Unity Version
Always install an LTS (Long-Term Support) version like 2022.3 LTS. These builds are stable, fully documented, and supported for two years. Avoid tech stream releases unless you’re prototyping for an internal jam.
Add Modules Based on Platform Goals
When you install Unity, only add the modules you need:
- Android/iOS Build Support for mobile
- WebGL for browser-based demos (hello Itch.io)
- Windows/Mac/Linux if you’re launching cross-platform like Thunderful or Double Stallion
Too many modules can cause asset bloat. Not enough can cost you dev time from installing later.
Set a Default Editor and Layout
In the Unity editor, save a custom layout and set your default script editor to Visual Studio. It’ll make debugging easier and avoid serialized nightmare situations later.
Use Unity Learn to Stay Synced
Sync your version choices with tutorials on Unity Learn. Nothing’s worse than a 2023 tutorial that uses features missing in your version.
Learn C# Before Unity (Yes, Really)
You dive headfirst into Unity, excited to build the next Among Us. Five minutes in, you’re staring down a NullReferenceException like it just cursed your entire bloodline. Let’s avoid that.
Understand Why C# Comes First
Unity runs on the C# programming language. Before you even touch the Unity editor, learn the basics of variables, conditionals, loops, and methods. Without that foundation, even simple bugs will feel like boss fights. If you want to release on Steam someday, this is your first rite of passage.
Start With a Guessing Game
A console-based “Guess the Number” game teaches you logic, conditionals, loops, and user input. All of these translate directly into Unity. It also forces you to debug simple errors like off-by-one logic or input mismatches. This builds the problem-solving reflexes you’ll need when scripts break inside Unity’s Play Mode.
Then Build Rock-Paper-Scissors
Next, write a Rock-Paper-Scissors game in C#. This adds functions, random number generation, and control flow. These concepts map directly to Unity’s game loop, especially when you start managing enemy AI or decision trees in action RPGs.
Use Visual Studio to Catch Mistakes Early
Your IDE matters. Visual Studio gives you intellisense, error tracking, and proper formatting. It reduces time spent debugging God class monster scripts and helps you spot issues. It also defends you from garbage collector lag during testing.
Your First Project: The Spinning Cube
A little confidence is worth its weight in Git commits. This spinning cube tutorial will give you an infusion of self assurance. You’ll get your first taste at motion control (with arrow keys) and logic.
Step 1: Open a New 3D Project
Launch Unity Hub and start a new 3D Core project. Name it something fun—like Worldless Movement Test—and save it to a dedicated folder. This project is your training ground before you scale up to your first card battler or 2D adventure game.
Pro Tip: Use a Long-Term Support (LTS) version to avoid bugs or mismatches when you’re importing packages or following tutorials.
Step 2: Create a Cube
In the Hierarchy, right-click and go to 3D Object > Cube. This will spawn a basic cube at (0, 0, 0). Adjust its position in the Inspector and rename it “PlayerCube.” You now have a controllable object, directly linked to every C# lesson you just learned.
Step 3: Write a New Script
Right-click in the Project > Assets folder and select Create > C# Script. Name it “PlayerMovement.” Attach it to your Cube by dragging it into the Inspector. Open the script in Visual Studio and write a simple movement function using Input.GetAxis.
This is the start of your game loop. It handles input, frame updates, and object motion.
1void Update() {
2    float x = Input.GetAxis("Horizontal") * Time.deltaTime * 5f;
3    float z = Input.GetAxis("Vertical") * Time.deltaTime * 5f;
4    transform.Translate(x, 0, z);
5}
Save, press Play, and move your cube with the arrow keys. Welcome to game dev.
Step 4: Avoid Common Pitfalls
Keep things lean. You don’t need the Unity Asset Store yet. Avoid asset bloat, and don’t over-engineer. Just keep tweaking. Games like Cuphead and Superliminal started with the basics.
Want next steps? Publish your spinning cube on Itch.io. It’s a milestone that proves you’ve crossed from watcher to maker.
Unity UI Basics
Now that you’ve built a spinning cube, let’s go a little deeper. You won’t get to a billion mobile downloads based on day one, but you’ll get your feet wet and start learning.
Anchor Your UI
Misaligned anchors are a common cause of UI sprawl. So, start by creating a Canvas in the Unity editor via GameObject > UI > Canvas. Every UI element needs this base. Next, add a Panel to serve as your background. Set the anchor presets (click the square icon in the Rect Transform) so your UI scales consistently across end user platforms, whether you’re building a mobile layout or prototyping for desktop.
Add a Start Button That Actually Works
With your Panel selected, right-click > UI > Button. Rename it “StartButton.” Add a Text child object and change the label to “Start Game.” Position and size it with Rect Transform tools. BChange the anchor too, or you’ll get wild layout shifts in different resolutions.
Then create a new script called MainMenu.cs, attach it to your Canvas, and wire up your button’s OnClick() event to call LoadGameScene().
1using UnityEngine;
2
3public class PlayerMovement : MonoBehaviour
4{
5    void Update()
6    {
7        float x = Input.GetAxis("Horizontal") * Time.deltaTime * 5f;
8        float z = Input.GetAxis("Vertical") * Time.deltaTime * 5f;
9        transform.Translate(x, 0, z);
10    }
11}
Save, return to Unity, and press the Play button in the Editor to test. Now you’ve got interaction without the God class monster trap.
Test and Refine in Play Mode
Use Play Mode to test positioning and function. Keep your UI minimal. You just need a few buttons and maybe a background image. If it feels clunky, tweak it. Remember: titles like Hollow Knight and Slay the Spire started with one clean menu screen before expanding.
Top 7 Unity Beginner Mistakes (And Fixes)
In a psychological study in a supermarket, people were less likely to buy jelly when there were 24 brands on the shelf, instead of only six. Why are we talking about jelly in a section on newb mistakes? Because Unity’s legendary flexibility can trip up new developers. Misused scripts, bloated assets, and confusing layouts are a common sight.
Here are seven rookie mistakes and how to fix each one before they frag you. You’ll see these insights shred in internal Unity user trends, including the ones shared at GDC and seen in Unity works projects.
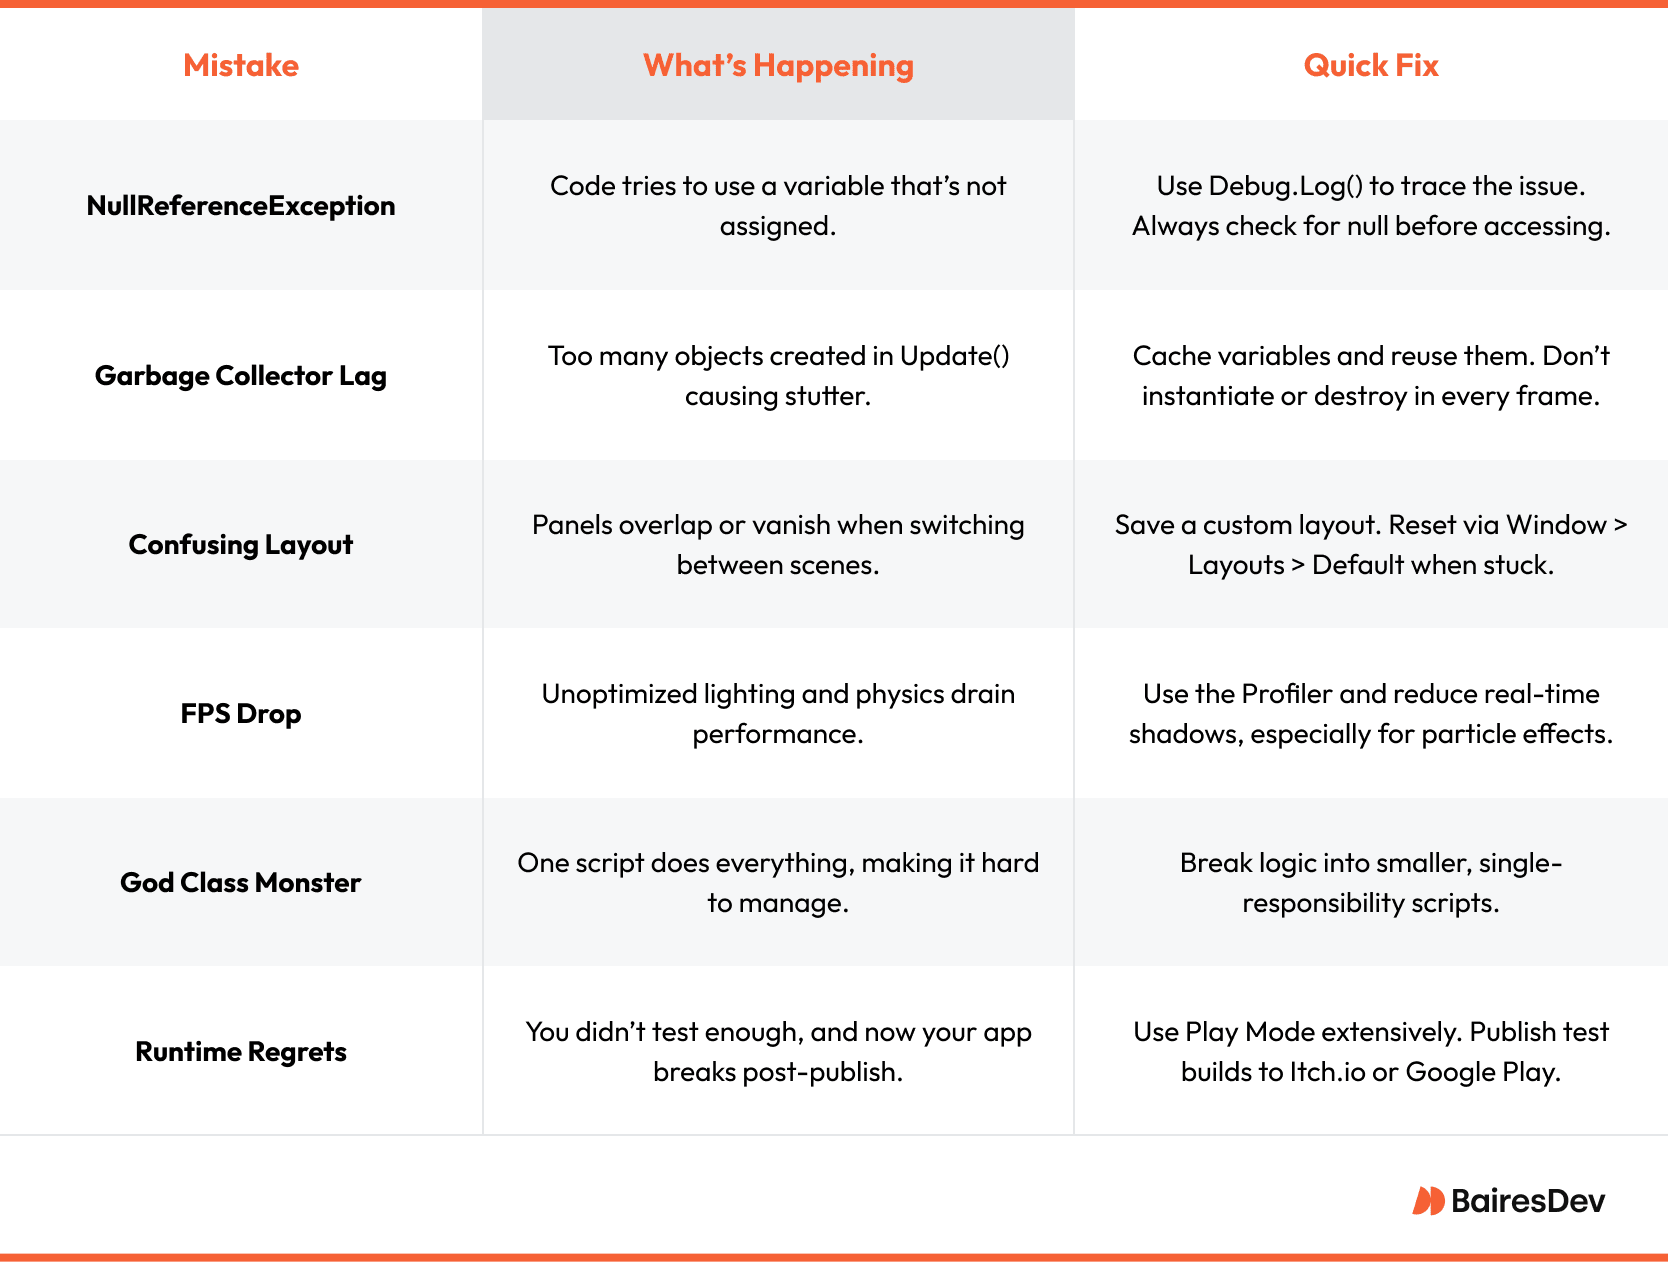
Pro Tip: Think seriously about the online learning paths certifications offered directly through Unity. They’ll help you duck the rookie mistakes.
How to Publish Your First Unity Game on Itch.io
You don’t need a massive project or pixel-perfect polish to publish your first Unity game. Just build something that works, export it cleanly, and hit upload with confidence.
Step 1: Prep Your Unity Game for Export
In the Unity editor, go to File > Build Settings and choose PC, Mac & Linux Standalone or WebGL, depending on your target platform. Add your active scene to the build list and click Build. Keep your Unity project lightweight by avoiding asset bloat and large plugins you don’t need. In Player Settings, set your window title and resolution, and disable unused features like full-screen mode or extra input mappings. Use the Universal Render Pipeline (URP) to get smooth performance across mobile, desktop, and even VR.
Step 2: Build and Zip Your Files
Once you build your Unity game, you’ll get a folder with everything you need to run it. PC exports include a .exe file. WebGL projects generate an index.html and related folders. Zip the build folder exactly as Unity outputs it. Don’t rename or move files afterward. Many first-time publishing errors come from missing dependencies or broken folder structure.
Step 3: Upload Your Game to Itch.io
Create a free account on Itch.io. Click Upload New Project and fill in your game title, description, and at least one screenshot. Tag your Unity game appropriately. Terms like “prototype,” “platformer,” or “browser game” help people find it. Choose Browser (WebGL) or Downloadable (PC/Mac) based on your build. Plenty of small Unity projects have launched this way during game jams and early development, including popular titles like Overcooked and Crossy Road.
Step 4: Share and Iterate on Your Unity Project
Once your Unity project is live, share it in developer communities like Unity forums, GameDev.tv groups, and Discord servers. Ask for feedback, but don’t wait for perfection. The best is the enemy of good enough. Your first Itch release is a milestone that proves you’ve built something real. Even a basic Unity prototype gives you experience with versioning, publishing, and sharing.
30-Day Roadmap: From Newbie to Itch.io
Follow this step-by-step plan to go from installing Unity to publishing your first playable build. Each week builds on the last, guiding you through tools, scripting, and release.
Best Unity Video Tutorials to Learn Fast
Brackeys has helped thousands go from newb to launch. Its tutorials have been used in countless jam games and early prototypes that later evolved into full indie releases. These videos will get you building fast, without the burnout badge.
- Brackeys – How to Make a Video Game in Unity: A six-part beginner tutorial that walks through building a complete Unity project using C#.
Best for: Total beginners using Unity Hub and C# for the first time.
Watch on YouTube - GameDev.tv – Unity 2D Course Introduction: A structured path from Rick Davidson with project-based learning and clear C# scripting fundamentals.
Best for: Those on a formal track through Unity courses or certifications.
Explore the Course - Unity – Create with Code: Unity’s official tutorial series that teaches core game programming concepts inside real Unity projects.
Best for: Learning C# scripting from internal Unity sources before diving into the Unity Asset Store.
Start Learning - Brackeys – UI in Unity: Covers Unity UI components like anchors, buttons, and Rect Transforms to avoid click-and-pray debugging.
Best for: Creating clean UI without ScriptableObject overload.
Watch on YouTube - Blackthornprod – I Made a Game in 1 Week with Unity:
A behind-the-scenes devlog showing how a small game is built from scratch and finished fast.
Best for: Seeing the full creative process and how to actually finish something.
Watch on YouTube
Advanced Unity Features to Explore (When Ready)
Once you’ve mastered the basics of Unity game development, these advanced features can help you build more complex, optimized, and professional-quality games without starting from scratch.
- Unity Animation System: Create smooth movement and sync logic without bloated scripts.
Start with the Animator window and check out Unity’s “Create with Code” animation lessons. - Unity Gaming Services (UGS): Add co-op, matchmaking, and lobbies with minimal backend hassle.
Use the UGS dashboard and follow the “Multiplayer Samples” project on Unity Learn. - Shader Graph: Build visual effects without writing shader code.
Open a URP project, then go to Window > Shader Graph to create node-based materials. - Addressables System: Load assets dynamically to boost performance and reduce bloat.
Install the Addressables package in the Package Manager and tag a few test assets as Addressable. - Unity Muse (Beta): Prototype faster with AI-assisted layout and content tools.
Enable Muse in Unity Hub, then experiment with AI-generated scenes and UI mockups.
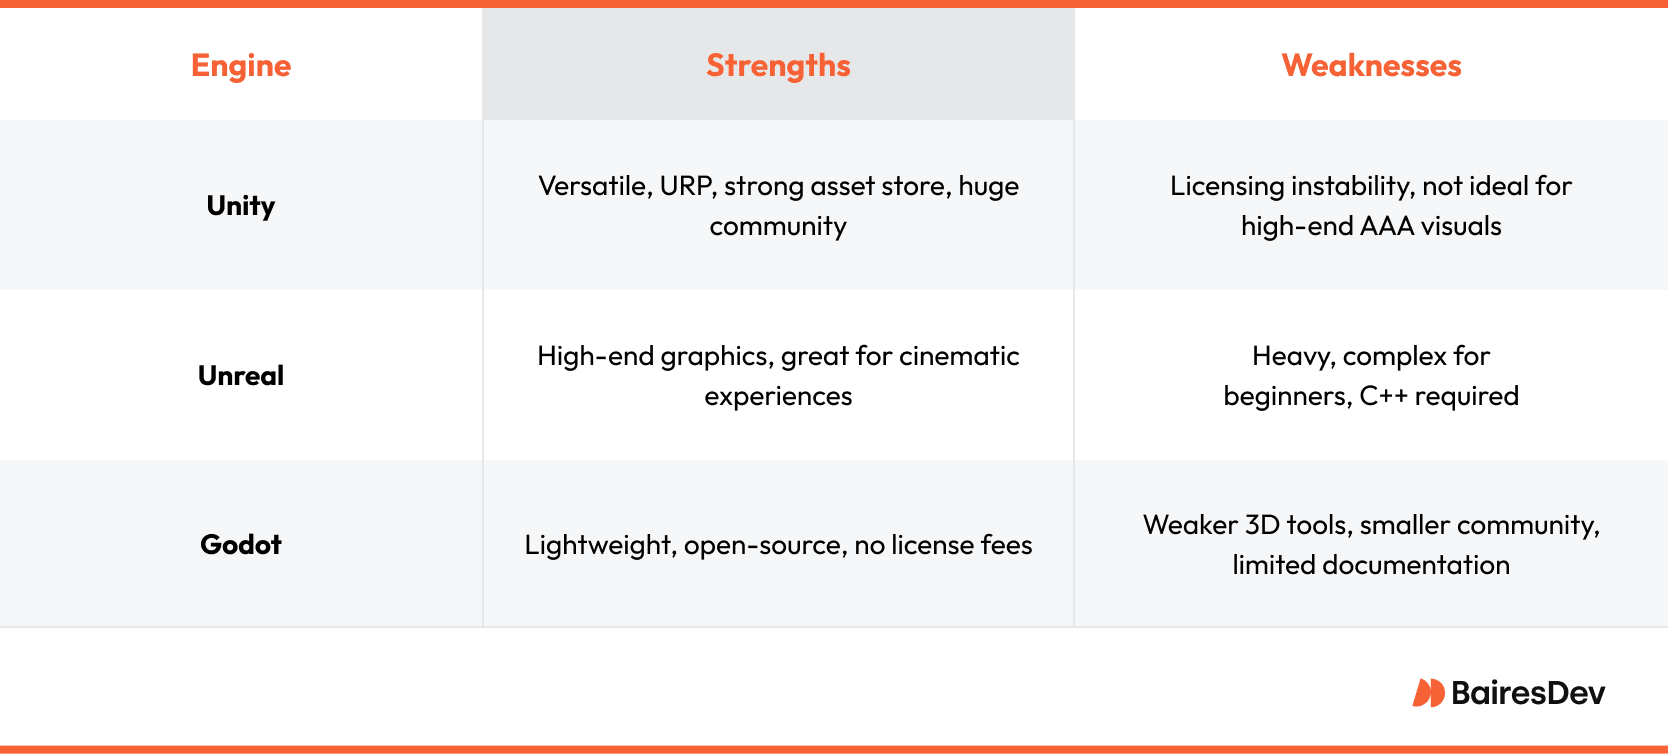
Unity vs. Godot vs. Unreal – Which Should You Learn?
Choosing the right game development engine depends on your goals. Unity is great for fast prototyping, Godot appeals to open-source fans, and Unreal dominates high-end 3D visuals.
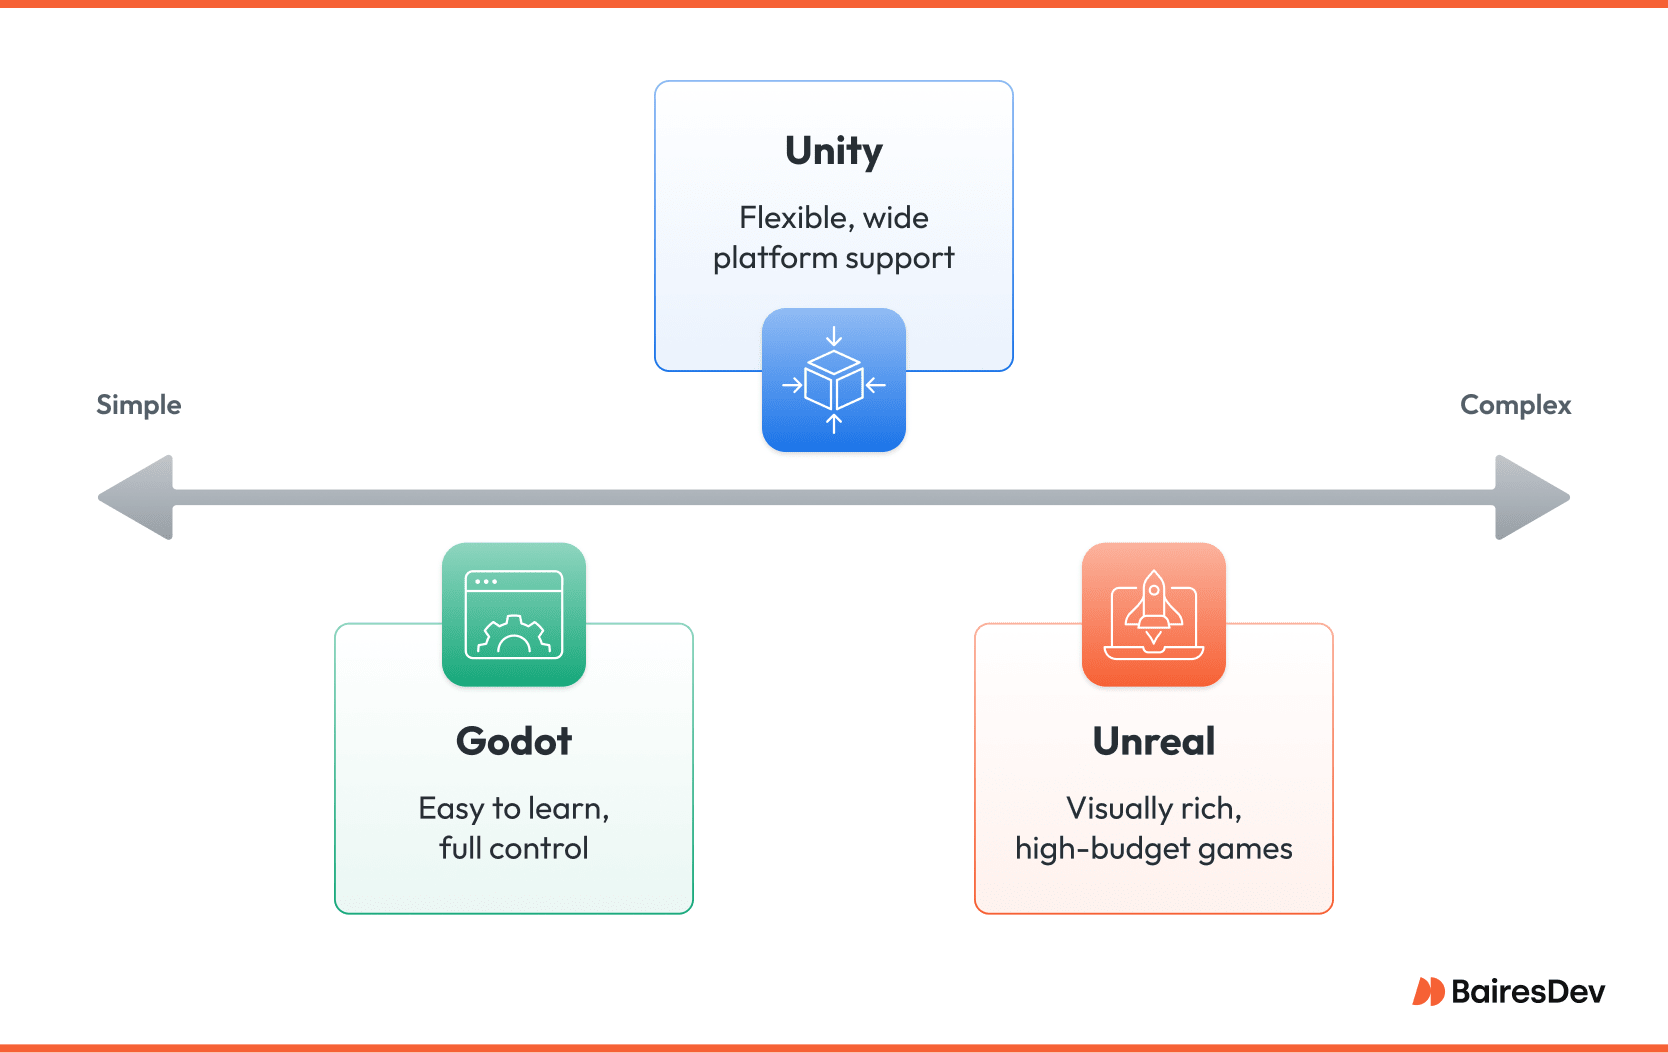
Unity
- Strengths: Huge asset store, flexible for 2D and 3D, great for mobile and VR.
- Weaknesses: Licensing drama, not ideal for AAA-quality visuals.
- Best for: Indie devs who value speed, tutorials, and wide platform support.
Godot
- Strengths: Lightweight, open-source, zero license fees.
- Weaknesses: Weaker 3D tools, smaller support community.
- Best for: Beginners and devs who want full control and no strings attached.
Unreal
- Strengths: Photorealistic graphics, robust physics, great for cinematics.
- Weaknesses: Heavy on system resources, C++ learning curve.
- Best for: Teams building visually rich, high-budget games.
Conclusion: Play the Long Game
When you first start to create games with the Unity engine, ou’ll run into ScriptableObject overload and weird bugs. You might even doubt you’re cut out for this. But each line of code you write will get you closer to your magnum opus. Every problem you solve in the Unity engine is a step toward mastering your craft. And you’ll get a Niantic-sized boost from Unity’s deep resources, dynamic community, and cross-platform support.
Games like Ori and the Blind Forest and Monument Valley didn’t happen overnight. Game developers made themwith broken builds and stubborn ideas. Share your progress on Itch.io, study other game makers’ paths, and keep your vision growing. In a few years, we may be mentioning your new title in an article.


